Hi everyone, Welcome to our recipe site. Today, I’m gonna show you how to prepare a distinctive dish, patisapta cake. It is one of my favorites food recipes. This time, I will make it a little bit tasty. This will be really delicious.
Patisapta Cake is one of the most well liked of current trending meals on earth. It is simple, it’s quick, it tastes delicious. It is appreciated by millions daily. Patisapta Cake is something which I’ve loved my whole life. They are fine and they look wonderful.
To get started with this recipe, we must prepare a few ingredients. You can have patisapta cake using 22 ingredients and 36 steps. Here is how you cook it.
The ingredients needed to make Patisapta Cake:
- Ingredients for Patisapta crepe
- 1 cup refined flour (Maida)
- 1/2 Cup fine Semolina (Sooji)
- 1/4 Cup Rice flour(freshly ground)
- 1/2 Cup regular Sugar
- 1 Cup Milk
- 1/4 tsp Salt
- as needed Water
- 1 Teaspoon Ghee/oil
- Ingredients for Stuffing
- 1 Cup Coconut freshly grated
- 3 Tablespoon Condensed milk
- 3 Tablespoon Brown sugar/grated Jaggery
- 1/4 Teaspoon Cardamom powder (optional)
- Ingredients for Kheer/Concentrated milk
- 3/4 Litre full fat Milk
- 1/4 Cup sweetened Condensed milk
- 2 Tablespoon Refined flour (Maida)
- 2 Whole green Cardamom
- For Garnishing
- handful Chopped Pistachios
- 3 tsp dry Rose petals
Steps to make Patisapta Cake:
- In a bowl, add in maida, fine semolina and rice flour. I used freshly ground rice flour. You can add store bought rice flour also.
- Mix with a fork.
- Also add in sugar and salt.
- Mix and make a thin batter with 1 cup of milk and water as required.
- The consistency of the batter must be thin.
- Cover and set aside for 2 hours, so that semolina and flour can absorb liquid well. This step will help to make soft pitha/crepe.
- For Stuffing - Place a small pan to stove top with 1 cup of grated coconut. You can use freshly grated coconut or dessicated coconut. Even packaged grated coconut can also be used.
- Dry roast in low heat until lightly toasted. This help to enhance the flavour of coconut. Then add in 2 tbsp brown sugar/grated jaggery and 1/4 cup condensed milk.
- Stir well to mix and then cook until the mixture becomes lumpy or sticky. Don’t make the mixture completely dry. Set aside.
- To make kheer or rabdi, first heat 3/4 litre of full fat milk to a pan with 2-3 whole cardamom.
- Bring to boil and then cook in low heat until milk reduces to half. When a layer of cream forms on the top of milk, stir to mix with milk. Scrap the sides in between to prevent burning. It will take about 1/2 an hour to reduce milk to half. So have patience and stir milk in between.
- In the meantime, dry roast 2 tablespoon of refined flour or maida to light golden brown.
- Make a slurry with roasted flour and 2-3 tablespoon of water. Add water after cooling the flour.
- Add in this slurry to the reduced milk. Stir well. This will help to concentrate milk further in a very short time.
- Also add in 1/4 cup of condensed milk. Mix well.
- Remove from heat and transfer to a bowl. The kheer or rabdi will thicken more as it cools down.
- To cook the patisapta/crepe - Stir and mix well again the patisapta batter. Check the consistency. If it thick, then add in little water and stir again. The batter should be smooth and free flowing.
- Prepare a square dish of (7.5)” size lined with cling flim. Also rub little oil or ghee to the bottom o the dish.
- Heat a non-stick pan. Grease the pan with 1-2 drops of oil/ghee.
- Pour 2 tablespoon of batter to the pan and rotate the pan holding the handle to spread the batter evenly. Keep flame in low heat.
- Cover with a lid and cook for about 40-50 seconds in low heat.
- Remove the cover and flip the pitha and cook for about 30 seconds. Don’t overcook otherwise cracks will form on the pitha. It will cook within a minute. Don’t change colour to brown. The pithas should be soft and lightly spotted.
- Remove from pan and make another pitha/crepe. Note that the pithas should be very thin. So spread as much as you can. The shape should not matter more,as you will arrange them according to the shape of your prepared dish. Also note that, before pouring batter, cool the pan little bit and grease with oil or ghee.
- Take the square dish and place crepe/pitha at the bottom of the dish to make a layer. Cut pithas in half so that you can easily cover the bottom of the dish with pitha.
- Spread some thick kheer/rabdi over the pithas.
- Next spread some prepared coconut mixture.
- Cover with another layer of pithas.
- Again repeat the process to make the layer of kheer.
- Sprinkle some chopped pistachios and rose petals.
- Spread again prepared coconut mixture.
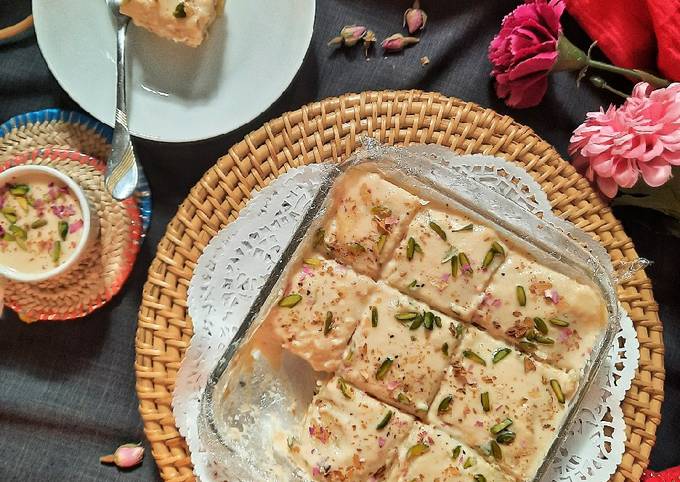
- Like this I made 4 layers of patisapta with kheer/rabdi and coconut mixture. Be generous while adding kheer. Top layer should be of kheer/rabdi. Garnish with chopped pistachios and rose petals. You can garnish with other nuts also. Using dry rose petal is completely optional. But it’s flavour really enhances the taste of the whole dish to the next level.
- Cover the dish with cling wrap and place in the refrigerator for at least 3-4 hours. Even you can keep the dish overnight in the refrigerator.
- Delicious, new looking patisapta pitha is ready now to enjoy.
- You can de mould the cake with the help of the cling wrap attached to the dish or you can cut the square pieces of the patisapta cake with a sharp knife.
- Place a cake piece to a serving dish and serve cool or at room temperature.
- For excellent taste, I recommend you to enjoy this dessert next day after refrigerating it overnight. This will help to soak moisture and flavour by the pithas from kheer, coconut and rose petals. Don’t forget to serve with some extra kheer/rabdi along with the cake.
So that’s going to wrap this up for this exceptional food patisapta cake recipe. Thanks so much for reading. I’m confident that you can make this at home. There is gonna be interesting food at home recipes coming up. Don’t forget to bookmark this page on your browser, and share it to your loved ones, colleague and friends. Thank you for reading. Go on get cooking!